Website

Thursday, September 29, 2011

MYO Hanky Wall Decor


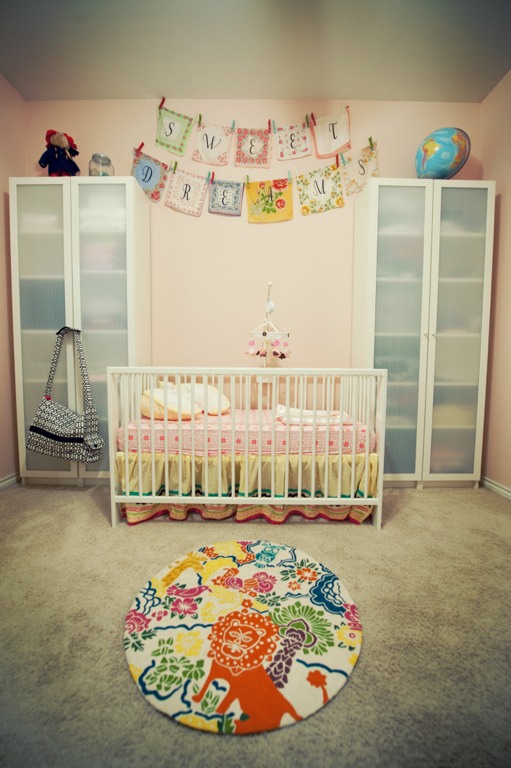
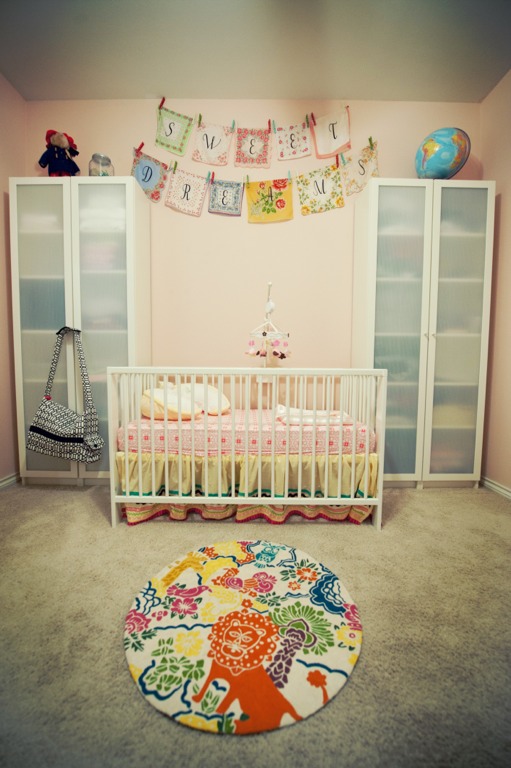
One of my favorite things in my daughters nursery is the "Sweet Dreams" hanky wall decor I made. It was so easy to make and became the focal point of the room. I think this hanky wall decor could also look great in a home spun boutique or women's home office. Here is how to make your own hanky wall decor.

1. Decide what your hankies will say. I chose "Sweet Dreams", because it is hanging over my daughters crib. I think it would be really great in a boutique or home office spelling your business name.

2. Use old handkerchief's you have or purchase some on Etsy.com like I did.

3. Purchase iron or stick on monogram letters from JoAnne's, Michael's or your local craft store. Apply the letters evenly on each hanky.

4. Hang the hankies evenly on string/twine using clothes pins. I found fun polka dot clothes pins at one of my favorite shops Gypsy Wagon. You could paint some yourself if you want to give it that extra detail.

5. Marvel and enjoy your hanky masterpiece.


Contact Decorator in a Box at www.mydiab.com to create your online custom design in the most financially savvy way!

Monday, September 12, 2011

Diaper Changing in Style!

One of my favorite things to do is re-use and add detail to furniture and window treatments. You can re-use things by making small modifications and adding design details. Today I will show you how to turn a vanity into a changing table. I will also show you how to add design detail to a window valance and crib skirt. First we will start with turning a vanity into a changing table.

Changing Table


This is the antique vanity that was my mothers and mine when we were little girls. I want my daughter Nora to also have this vanity in her room to carry on the tradition. At three months she is not ready to use a vanity just yet and I don't have a spot in our home. I thought why not use it now by turning it into a changing table. Here is how I did it!

Items you will need:
- Vanity
- Staple Gun
- Heavy Duty Velcro
- 7" Bed Lifts - Can be found at Bed Bath and Beyond
- Plywood Board - Cut to the length and width of vanity top
- Cotton Batting
- Oil Cloth
- Diaper Changing Pad
- 3-4 Ready Made Window Valances
- Coordinating Crib Skirt


Step 1 Changing Table Top

Purchase and cut a plywood board to the length and width of your vanity top. If you are not handy with a saw visit Home Depot and they will cut it to your desired size at no cost.


Step 2 Upholster the Top

Purchase a scrubbable and water proof fabric such as a oil cloth or vinyl. I selected a retro pink floral at one of my favorite local stores Gypsy Wagon. You will also need to purchase cotton batting from your local craft supply store. The batting will soften the changing table top. Staple gun the batting neatly on the plywood board then staple the oil cloth over the batting. Attach the top with heavy duty Velcro in each corner of the top. Secure your changing table pad and you have just completed the top portion of your table.


Step 3 Lift the Vanity to Changing Height

Purchase 7" bed lifts from Bed Bath and Beyond to lift the vanity making it close to 32" in height. Get the help of two strong people to help you place the lifts under the vanity legs.


Step 4 Skirt the Vanity

Purchase three ready made window valances in the fabric of your choice and a tension rod to fit the vanity opening width. You will need enough valances to wrap around the bottom of the vanity and cover the upper opening of the vanity. You may also order a valance for the window and coordinating crib skirt.


Step 5 Add Ribbon and Trim Detail

Visit your local fabric store and select fun ribbon and trims. Stitch them in rows onto the vanity skirts/valances to give it a custom look. Add cotton eyelet trim to the bottom of the valance to get the desired length and cover the bed lifts. Be sure to get enough ribbon to add onto your coordinating bed skirt and window valance (that is being used on the window). After sewing on your trim and ribbon cut your valances into 4 separate pieces. One for the bottom front skirt, two for the sides and one small skirt for the upper opening of the vanity. Sew the ends of each section to give it a finished look. Attach the bottom skirt with Velcro and the top skirt with the tension rod.


Step 6 Add Accessories and Diaper Supplies

Add accessories for your baby to look at like a colorful fabric banner hanging on the mirror. Nora loves to stand and try and reach her banner. She also loves looking in the mirror and wonders who that cool baby is looking at her. Fill the drawers with diaper changing supplies. I even placed a basket in the opening to store diapers. Plug in your diaper wipe warmer and you are ready for diaper changing in the most stylish way.

Step 7 Enjoy Changing Diapers!


Do you have a cool changing table or nursery idea? Please share it with me!

Contact Decorator in a Box at www.mydiab.com to create your online custom design in the most financially savvy way!

Sunday, August 28, 2011

Nora's Nursery

I have been getting lots of requests to show Nora's Nursery. Well here is the big reveal!

While in the "nesting" stage of my pregnancy I was very inspired. I mean I was "Sleeping with the Enemy" organized in a disturbing way. I had to have every picture hung and onesie washed. I thought once the baby arrived I would not have time to do anything (kind of became true). I wanted to create a space that was whimsical, vintage and modern all at the same time. I considered avoiding pink on the walls, but that just didn't feel right. In the coming weeks I will show you how I created furniture and accessories for the room. I think you will be surprised how you do not need to spend a fortune to create a nursery.

So... here it is Nora's boudoir! I just had to do before and after photos, I am such a sucker for that. Thanks to my talented friend Laura Squire of Ra-foto.com the after photos look lovely!


Crib Wall Before


Crib Wall After


Dresser Wall Before


Dresser Wall After


Vanity Wall Before


Vanity Wall After


Design Details


Before Baby


After Baby


Contact Decorator in a Box at www.mydiab.com to create your online custom design in the most financially savvy way!

Sunday, August 21, 2011

MyDiab's New Addition

If anyone has been wondering why I have not done a post in 2 months this is why. Introducing the newest member to the Decorator in a Box team Nora Grace born June 22nd. I couldn't be a happier new Mommy or feel more blessed. I can't wait to introduce her to the world of interior design if she is interested. If she would rather be an astronaut that is fine too.


In the weeks ahead I will share Nora's nursery design with you all. I will show you how to turn an antique vanity into a changing table, add detail to a ready made crib skirt and valance, create wall art from handkerchiefs and more.

I had know idea having a little bundle would give me this much design inspiration!

xo ~ Annie

Contact Decorator in a Box at www.mydiab.com to create your online custom design in the most financially savvy way!

Thursday, June 9, 2011

Gifts for Dad


{photos from the top left to right; wool ipad sleeve, austin healey print, checked shirt, bike frame pouch}


Fathers Day can be a gift giving challenge. After all when my Dad needs something he just usually goes and gets it. I think that is why Dad's end up with the ultimate worst holiday gifts like socks and another coffee mug. I try to find those items he won't find for himself. I think how my Dad loves riding his bike from Redondo Beach to Manhattan Beach in a comfortable pair of Vans while listening to some Jim Croce. He can always use a new shirt or a cool watch. I don't think I could go wrong getting him any photography of an old Austin Healey to admire in his office. Save Dad the socks and try to come up with something more personal this year. Although I'm sure a nice card, your time and steaks on the grill would make his day just fine. Here are some of my Father's Day picks! ~xo~ Annie


{warby parker winston frames}


{chukka low van}


{zen chronograph}

{vinyl jim croce}

Contact Decorator in a Box at www.mydiab.com to create your online custom design in the most financially savvy way!

Wednesday, June 8, 2011

Another Level of Monogrammed


I have always loved the prepster feel of a monogrammed accessory. If your looking for that special personalized gift or just a way to spruce up your office Dabney Lee is where it's at. Her home and office products take monogramming to a whole new level. The bright colors and patterns are a sure win for any hostess gift. Dabney believes color has no rules and your home office should inspire and dazzle you (I love that!). I think I need my office to dazzle a bit with some Dabney Lee desktop accessories. Enjoy! ~xo~ Annie


{all photos via Dabney Lee Home}

Contact Decorator in a Box at www.mydiab.com to create your online custom design in the most financially savvy way!

Tuesday, June 7, 2011

Vintage Mix


I love the idea of sipping iced tea in these vintage round back chairs on a lanai or garden room.

A great design always has a little vintage in the mix. It's all about mixing the new with the old and the traditional with the modern to create a nice balance. It may be as simple as adding a pair of antique Asian lamps or a great mid-century modern chair. As long as you feel the piece is special and it makes you smile find a way to incorporate it into your space. Sometimes I can design an entire room starting with a single piece of furniture for inspiration. Find that piece that inspires you and just go with it. ~xo~ Annie


Add a unique lamp such as this antique porcelain lamp to create interest or conversation in a room.


Bring in some mid-century wall art such as this gold metal floral peice to add a vintage gold accent above a sofa or credenza.


This vintage lattice credenza from 1stdibs.com is a great peice to design an entire room around.


I can see Don Draper lounging in this rattan chair on one of his L.A. visits.


A mirror such as this gold sunburst makes a perfect vintage accent.


Vintage barware like these 1960's lowball glasses are a fun and affordable way to add that retro touch.


I always love a pop of red and a vintage pop of red is even better like this metal dining table in a breakfast nook.

Contact Decorator in a Box at www.mydiab.com to create your online custom design in the most financially savvy way!